THE CHEST SUPPORTED ROW (BENEFITS & PROPER FORM)
If you want to build up your overall back width and thickness as effectively as possible, your workout plan is not complete without a basic horizontal pulling movement or two added into the mix.
Rowing exercises target the entire back complex for overall mass including the lats, traps, rhomboids, and the smaller muscles of the mid and upper back.
There are plenty of options to choose from here, such as barbell rows or dumbbell rows, as well as various machine rows. Yet, today I want to introduce you to a fairly uncommon but highly effective variation known as the “chest supported dumbbell row.”
This exercise mimics the same basic movement as a regular bent over row, except that you’ll be leaning your upper body against an incline bench throughout the lift.
The chest supported row offers a few distinct advantages over standard bent over free weight rows…
Reduces The Use Of Momentum – Leaning forward with your torso pinned against the bench makes it much harder to “heave” the weight up and use outside momentum to complete each rep. This maximizes the tension on your lats and mid-back for better overall stimulation and growth.
Decreases Lower Back Stress – This is a huge benefit for those who experience lower back discomfort during standard free weight rows (it could also help those who suffer from lower back pain from deadlifts). Again, since your upper body is fully supported, the amount of stress on the lower back is almost completely eliminated when using this variation.
Ensures Proper Rowing Posture – Rather than having to stop the set due to fatigue in your lower back and legs (this is especially common for beginners), the chest supported row ensures that you’re able to train the targeted muscles all the way to muscular failure without any other areas acting as weak links.
The proper form on these is fairly simple, and here’s how to go about it…
(I’d suggest watching the video below for a live demonstration of the correct form)
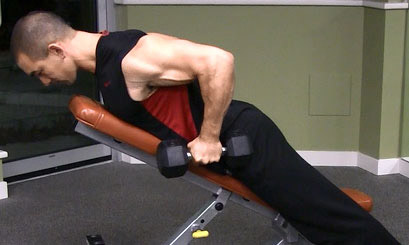
Chest Supported Dumbbell Row: Proper Form
1) Set an adjustable bench at about a 30-45 degree angle.
2) Lay face down with your legs straight out behind you, head hanging over the top of the bench and neck in a neutral position.
3) Grab a pair of dumbbells using a neutral grip, and while keeping your shoulders down and back at all times, row the weight up into ribcage until your lats and mid-back are fully contracted. (The use of an overhand or underhand grip is also an option, though most people find the neutral grip to be most comfortable here)
4) Pause in the fully contracted position for a brief moment and squeeze your shoulder blades together, and then slowly lower the weights back down into the starting position.
As with all pulling movements for the back, you can further maximize the tension on the target muscles by:
A) Focusing on pulling through your elbows rather than your hands.
B) Using a set of lifting straps or lifting hooks to further eliminate your hands and grip from the equation.
The chest supported row can pretty much be included anywhere in your back workout for 2-4 sets of anywhere from 5-10 reps.
If you have a questionable lower back or are just looking for a new free weight bent over row variation to build up your overall back size and strength, I’d highly suggest giving the chest supported dumbbell row a try.
And if you like this one, another related exercise worth checking out is the seal row.
If you found this article helpful, make sure to sign up for your FREE custom fitness plan below...