6 TIPS TO ELIMINATE LOWER BACK PAIN FROM DEADLIFTS

Deadlifts and lower back pain. Lower back pain and deadlifts.
For many lifters, these two things seem to go hand in hand.
Because the deadlift is such a technically complex exercise and allows you to handle very heavy weights, it can easily place your lower back into a compromising position if you’re performing it incorrectly.
In today’s post I’ll be outlining 6 deadlift form adjustments you should employ to minimize the pressure on your lower back and help you perform the lift as safely as possible.
Not only will these form cues reduce your chances of lower back injury, but they’ll also help to increase your deadlifting strength as well.
While these adjustments aren’t guaranteed to eliminate your issues altogether, this is the best place to start if your lower back has been feeling a bit “off” during the exercise.
Several other problems can come into play as well, such as muscular imbalances, tightness/weakness in certain areas, pre-existing joint injuries etc, but correcting improper technique should always be the first step.
6 Form Tips To Eliminate Lower Back Pain From Deadlifts
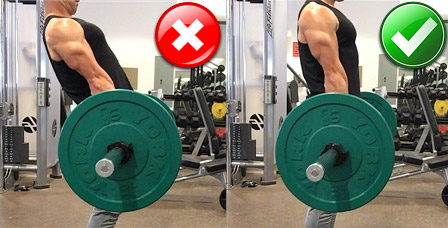
#1 – Keep Your Lower Back In Its Natural Arch.
One of the most common deadlifting mistakes is trying to pull a heavy weight off the floor with a rounded lower back.
This is a frequent cause of deadlifting injuries, since it places uneven pressure on the spinal discs leading to possible bulges, herniations or pinched nerves.
However, deadlifting with an excessive arch in your lower back can also lead to similar problems.
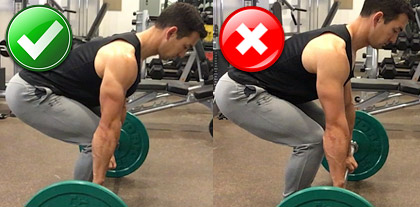
To maintain a balanced load on your lower back throughout the exercise, focus on keeping your lower back in its natural (very slightly curved) position. It should be the same curve that you have when you’re standing.
Make sure to set your lower back in that position before you begin to pull the weight. If you try to do this once the weight has already left the floor you won’t be successful.
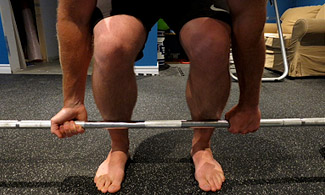
In order to keep your back from rounding over, position the bar over your mid-foot right up against your shins, and then raise your chest up, pulls your hips toward the ceiling and tense your core.
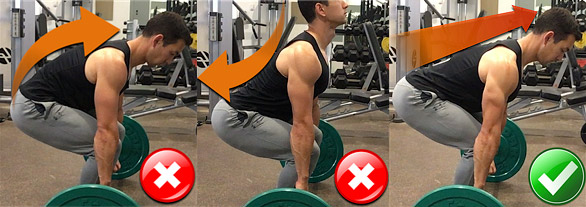
As you begin each rep, make sure that your hips and chest rise at the same time.
If your hips rise too early (this is largely caused by deadlifting without using your legs to drive the weight up), your lower back will have to work way harder than it should.
Also make sure to reset your spine in between each rep to prevent your lower back from fatiguing and rounding over as the set progresses.
Each time the bar touches the floor, raise your chest up again, ensure that your spine is in a neutral position, draw in another breath and tense up your core, and then perform the next rep.
#2 – Focus On Pushing Rather Than Pulling.
Although the word “pull” is often used to describe the deadlift, taking this too literally can easily become a recipe for lower back problems.
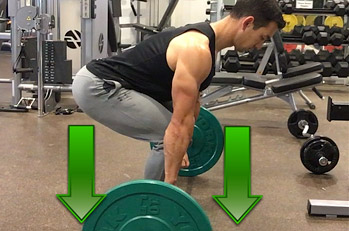
Rather than simply pulling the weight off the floor using your arms and lower back, a more useful cue is to focus on driving your feet into the floor instead.
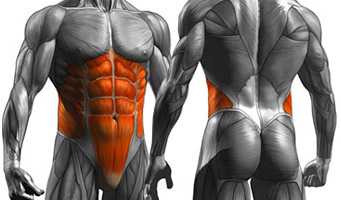
The deadlift does stimulate the entire lower and upper back musculature, but it’s better to think of it as a leg exercise during the actual execution.
Imagine that your upper body is simply there to hold the weight in place and support your back, but that the actual force to move it is coming from your lower body.
Not only will this reduce the stress on your lower back, but it will help to maximize your deadlifting strength as well.
#3 – Keep The Bar Close To Your Body
The bar should be right up against your legs throughout the entire set and travel in a straight line from top to bottom without any horizontal movement.
If you allow the far to drift away from your body on each rep you’ll place more stress on your lower back.
As outlined above, you’ll want to position the bar over your mid-foot and have it touching your shins before beginning. As you drive the weight up, it should essentially drag over your shins, knees and thighs on its way to the top position.
If you find that the bar is stressing your shins or even scraping them, you can protect them using long socks or pants.
You also want to make sure that the bar isn’t hitting your knees on the way down.
Not only can this be painful, but it’s stressful to your lower back too since it pushes the weight further away from your center of gravity.
Keep your knees out of the way by pushing your hips back as you lower the weight. This creates a clear path so the bar can travel in a straight vertical line.
Once the bar passes your knees, you can then bend more at the legs in order to get the bar down to the floor.
#4 – Don’t Lean Back At The Top Of The Rep
Hyperextending your lower back after completing each rep compresses your spinal discs.
You may have seen some people doing this in powerlifting videos, but this is typically only done during a competition to show the judge that the weight has been fully locked out. They don’t do this during regular training sessions.
Once you’re in that upright standing position, the barbell has already reach its highest point and leaning back further will cause more harm than good.
Instead, simply lift the bar up until your upper body is perpendicular to the floor and stop there.
Once fully extended, squeeze your glutes to lock your hips in place, keep your core tight, and then lower the bar back down.
#5 – Brace Your Core
This is something that most people performing deadlifts in the gym don’t even think about, yet it will go a long way in protecting your lower back as well as helping you lift heavier weights.
To do this, draw a deep breath into your belly prior to each rep and then tense up your core very tightly before lifting the weight.
A good cue for this is to make the same motion you would as if you were about to be punched in the stomach.
Bracing your core will increase intra-abdominal pressure for additional spinal support, and will help to prevent your hips from rising too early and your back from folding over during the lift.
#6 – Stay Even From Side To Side
This may seem like an obvious point, but always make sure that you’re gripping the bar evenly and that your hips and shoulders are in line with eachother horizontally.
Also ensure that you’re maintaining an equal stance and that both your feet are pointing at the same angle.
When you go to perform each rep, don’t allow one side to perform more work than the other. Focus on driving the weight up evenly using both legs and pulling evenly with each side of your upper body.
Any imbalances from side to side will cause your spine to twist and will increase the stress on your lower back, especially as you progress to heavier and heavier weights.
Lower Back Pain From Deadlifts: Quick Review
When it comes to eliminating deadlift lower back pain, these are the main form cues you’ll want to be focusing on during the exercise.
To sum up the main points…
– Keep your lower back in its natural (slightly curved) position. Don’t allow it to round over, and don’t excessively arch it either.
– Ensure that your hips and chest rise at the same time on each rep. Allowing your hips to rise faster will increase lower back strain.
– Keep the bar close to your body throughout the entire set. It should start pressed against your chins and drag over your knees and thighs on the way up, traveling in a straight line.
– Do not allow the bar to hit your knees on the way down. The bar path should be vertical both on the concentric and eccentric portion of the rep.
– Do not hyperextend your lower back in the standing position. Simply lift the bar until you’re upright and then lower it back down.
– Brace your core prior to each rep by drawing a deep breath into your belly and tensing your abs. This will help to support your spine.
– Make sure your setup is perfectly even from side to side in terms of grip width, shoulder/hip position and foot stance.
Although making these adjustments isn’t guaranteed to eliminate your lower back issues altogether, it will go a long way in getting you back on the road to pain-free deadlifts.
If you found this article helpful, make sure to sign up for your FREE custom fitness plan below...